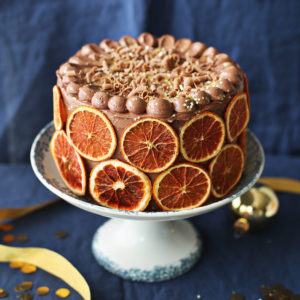
Recipe: Super Glam Party Cake
***Rachel Khoo would like to thank all the inspiring people who helped make the Khoollect studio a hive of creativity. Although the Khoollect studio’s doors have now closed, you can keep up with Rachel’s newest adventures on RachelKhoo.com and on Rachel’s Instagram and Facebook pages – and, continue to enjoy the Khoollect website’s stories and recipes, which will remain available.***


(21 votes, average: 3.52 out of 5)
- Share:
-

-

-

-

-


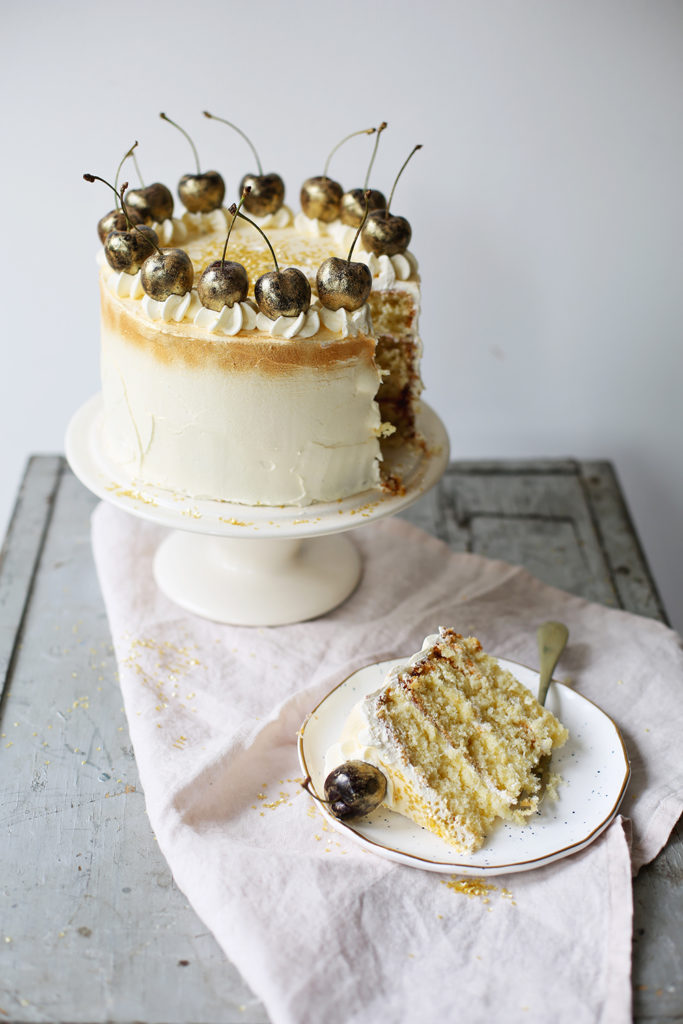
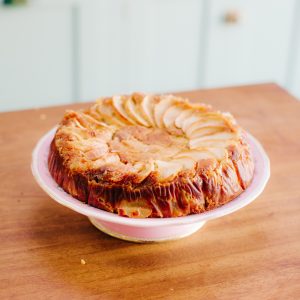
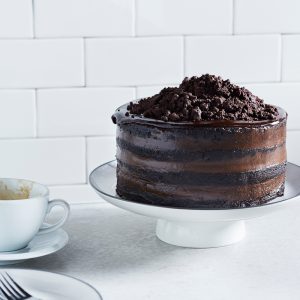
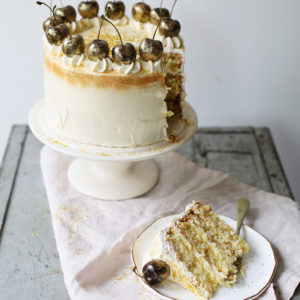
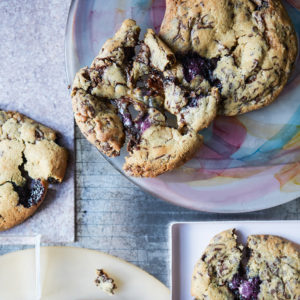
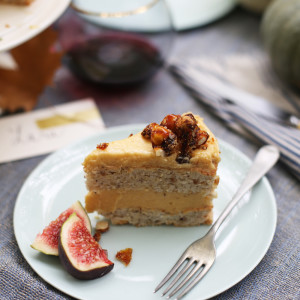
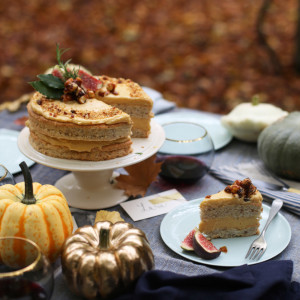
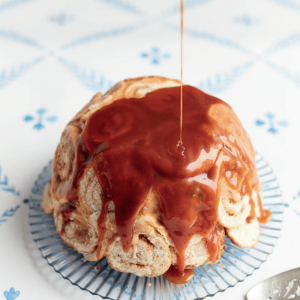
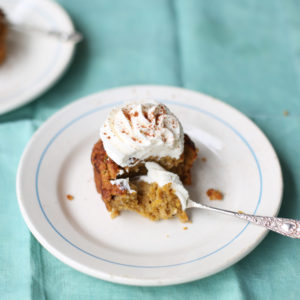
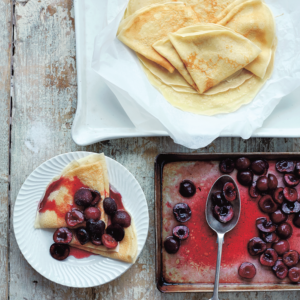
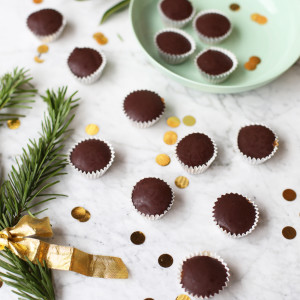
Everyone needs a glamourous cake in their baking repertoire and this little number is quite the flamboyant centrepiece. Layer cakes are deceptively simple to whip up, but with their towering majesty and extra room for fluffy buttercream, they never fail to add a little wow-factor to even a simple celebration cake. I use a simple yoghurt base and then jazz it up with these glitzy gold-shimmered cherries. This is a good basic sponge recipe to work with for celebration cakes. It’s quick to make, a good texture for layering up and a general crowd-pleaser.
Be sure to wrap it up after it has cooled and it should keep moist for a couple of days. I haven’t used sugar syrup in this particular cake, but if you are planning on assembling a few days ahead of eating it, it helps to keep the cake from drying out.
Super Glam Party Cake
-
(21 votes, average: 3.52 out of 5)
Preparation Time30 MINUTES
Cooking Time45 MINUTES
Resting Time30 MINUTES
Serves10
LevelMedium
ingredients
For the cake
250g unsalted butter
250g caster sugar
5 eggs, beaten
130ml plain yoghurt
330g plain flour
3 tsp baking powder
a generous pinch salt
13 plump cherries
For the buttercream
375g super soft unsalted butter
450g icing sugar, sieved
Grease and line the base of 2 x 19 cm sandwich tins with baking paper.
Preheat the oven to 180c/160c fan. In a freestanding mixer, cream the butter and the sugar until super light, fluffy and pale. Scrape down the sides, then beat again. Add the eggs, one at a time, until you have a smooth batter. Then stir through the yoghurt. Sieve the flour, baking powder and salt into a bowl. Fold in the flour, in batches, until you have a smooth batter. Divide between the tins and bake for 45 minutes or until a skewer comes out clean. Once cooked, remove from the oven. Leave to cool for a couple of minutes, before flipping them out onto a cooling rack.
In a mixer, beat the butter until extremely light. I usually just leave it for about 5 minutes to get it really creamy. Add the icing sugar, one spoon at a time, until fully incorporated.
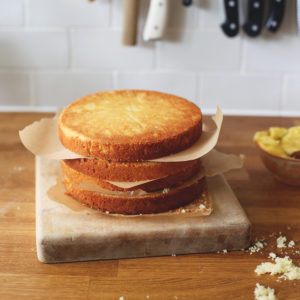
Once the cakes are cool, cut each one in half. Level them off if necessary. You want to use the flat base of the cakes as the top of the iced cake. To ice, place one of the 4 layers of cake on your serving plate, or a cake turn table. Dollop about 3 tbsp of the buttercream icing on the top and slide a palette knife over the top, spreading the icing out evenly.
Place the next cake layer on top and repeat with the icing. Add the next, do the same again, and finally place the top layer on top. Do a large dollop of icing on the top of the cake, and using a palette knife, slowly push the buttercream icing down the sides smoothing it out as you go with the flat side of the palette knife. Keep dolloping it on and smoothing the side. Do this roughly (this is the crumb layer, which will set the strays crumbs in place) and then place in the fridge for 30 minutes to set the buttercream icing.
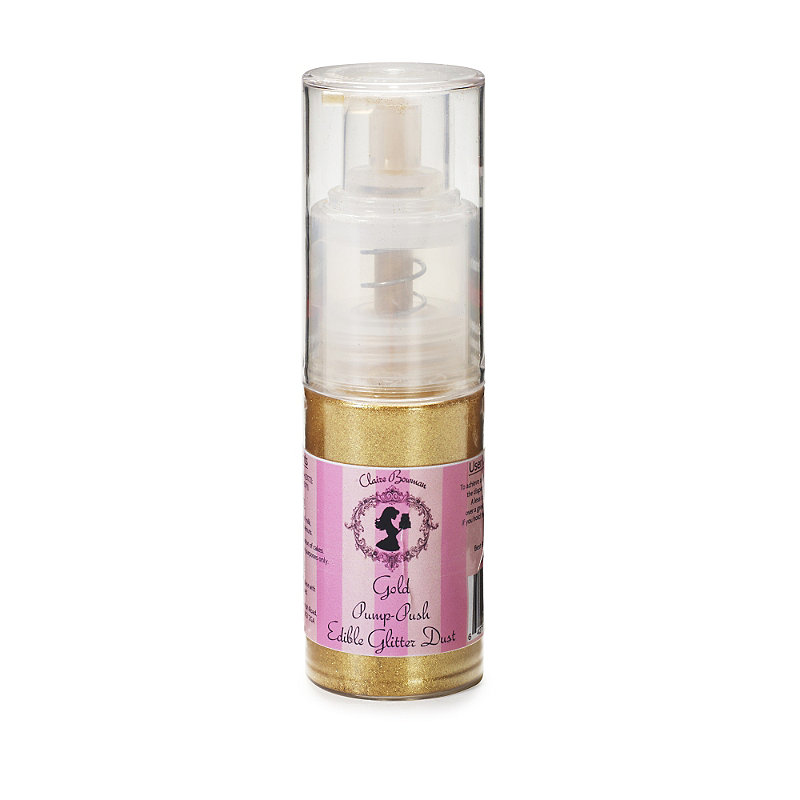
In the meantime, dust the cherries with the gold dust and set aside.
After it is firm, pull it out the fridge and repeat the icing process until you have a smooth, even finish. Dip the palette dip in boiling water and wipe dry and smooth down the sides if you want a perfect finish. Use a little of the gold dust powder to dust the side of the cake.
Place the remaining buttercream icing in a piping bag fitted with a star nozzle. Pipe little stars and place the gold cherries on top of each one.
Preparation Time30 MINUTES
Cooking Time45 MINUTES
Resting Time30 MINUTES
Serves10
LevelMedium
ingredients
For the cake
250g unsalted butter
250g caster sugar
5 eggs, beaten
130ml plain yoghurt
330g plain flour
3 tsp baking powder
a generous pinch salt
13 plump cherries
For the buttercream
375g super soft unsalted butter
450g icing sugar, sieved
Grease and line the base of 2 x 19 cm sandwich tins with baking paper.
Preheat the oven to 180c/160c fan. In a freestanding mixer, cream the butter and the sugar until super light, fluffy and pale. Scrape down the sides, then beat again. Add the eggs, one at a time, until you have a smooth batter. Then stir through the yoghurt. Sieve the flour, baking powder and salt into a bowl. Fold in the flour, in batches, until you have a smooth batter. Divide between the tins and bake for 45 minutes or until a skewer comes out clean. Once cooked, remove from the oven. Leave to cool for a couple of minutes, before flipping them out onto a cooling rack.
In a mixer, beat the butter until extremely light. I usually just leave it for about 5 minutes to get it really creamy. Add the icing sugar, one spoon at a time, until fully incorporated.
Once the cakes are cool, cut each one in half. Level them off if necessary. You want to use the flat base of the cakes as the top of the iced cake. To ice, place one of the 4 layers of cake on your serving plate, or a cake turn table. Dollop about 3 tbsp of the buttercream icing on the top and slide a palette knife over the top, spreading the icing out evenly.
Place the next cake layer on top and repeat with the icing. Add the next, do the same again, and finally place the top layer on top. Do a large dollop of icing on the top of the cake, and using a palette knife, slowly push the buttercream icing down the sides smoothing it out as you go with the flat side of the palette knife. Keep dolloping it on and smoothing the side. Do this roughly (this is the crumb layer, which will set the strays crumbs in place) and then place in the fridge for 30 minutes to set the buttercream icing.
In the meantime, dust the cherries with the gold dust and set aside.
After it is firm, pull it out the fridge and repeat the icing process until you have a smooth, even finish. Dip the palette dip in boiling water and wipe dry and smooth down the sides if you want a perfect finish. Use a little of the gold dust powder to dust the side of the cake.
Place the remaining buttercream icing in a piping bag fitted with a star nozzle. Pipe little stars and place the gold cherries on top of each one.
Everyone needs a glamourous cake in their baking repertoire and this little number is quite the flamboyant centrepiece. Layer cakes are deceptively simple to whip up, but with their towering majesty and extra room for fluffy buttercream, they never fail to add a little wow-factor to even a simple celebration cake. I use a simple yoghurt base and then jazz it up with these glitzy gold-shimmered cherries. This is a good basic sponge recipe to work with for celebration cakes. It’s quick to make, a good texture for layering up and a general crowd-pleaser.
Be sure to wrap it up after it has cooled and it should keep moist for a couple of days. I haven’t used sugar syrup in this particular cake, but if you are planning on assembling a few days ahead of eating it, it helps to keep the cake from drying out.
Super Glam Party Cake
Grease and line the base of 2 x 19 cm sandwich tins with baking paper.
Preheat the oven to 180c/160c fan. In a freestanding mixer, cream the butter and the sugar until super light, fluffy and pale. Scrape down the sides, then beat again. Add the eggs, one at a time, until you have a smooth batter. Then stir through the yoghurt. Sieve the flour, baking powder and salt into a bowl. Fold in the flour, in batches, until you have a smooth batter. Divide between the tins and bake for 45 minutes or until a skewer comes out clean. Once cooked, remove from the oven. Leave to cool for a couple of minutes, before flipping them out onto a cooling rack.
In a mixer, beat the butter until extremely light. I usually just leave it for about 5 minutes to get it really creamy. Add the icing sugar, one spoon at a time, until fully incorporated.
Once the cakes are cool, cut each one in half. Level them off if necessary. You want to use the flat base of the cakes as the top of the iced cake. To ice, place one of the 4 layers of cake on your serving plate, or a cake turn table. Dollop about 3 tbsp of the buttercream icing on the top and slide a palette knife over the top, spreading the icing out evenly.
Place the next cake layer on top and repeat with the icing. Add the next, do the same again, and finally place the top layer on top. Do a large dollop of icing on the top of the cake, and using a palette knife, slowly push the buttercream icing down the sides smoothing it out as you go with the flat side of the palette knife. Keep dolloping it on and smoothing the side. Do this roughly (this is the crumb layer, which will set the strays crumbs in place) and then place in the fridge for 30 minutes to set the buttercream icing.
In the meantime, dust the cherries with the gold dust and set aside.
After it is firm, pull it out the fridge and repeat the icing process until you have a smooth, even finish. Dip the palette dip in boiling water and wipe dry and smooth down the sides if you want a perfect finish. Use a little of the gold dust powder to dust the side of the cake.
Place the remaining buttercream icing in a piping bag fitted with a star nozzle. Pipe little stars and place the gold cherries on top of each one.
- Share:
-
-
-
-
-
Frankie is Khoollect’s Food Editor. It's her job to devise and test new recipes, and make every di...
READ MORE BY Frankie UnsworthYou decide
Frankie is Khoollect’s Food Editor. It's her job to devise and test new recipes, and make every di...
READ MORE BY Frankie UnsworthYou decide
Frankie is Khoollect’s Food Editor. It's her job to devise and test new recipes, and make every di...
READ MORE BY Frankie UnsworthYou decide


Recipe looks good, but if you want an American audience to actually make your recipes, kindly provide conversions. Many other sites do. Thank you
Hi Nicholas,
Thanks for your suggestion. I used to teach French patisserie to American tourists in Paris and this would be a big discussion point. However the benefits of using weight measurements definitely ‘out weighs’ (excuse my pun 😉 using volume measurements:
1. It’s more accurate
This is the most obvious reason. Volume measurements can be extremely inaccurate. The way flour is packed into it’s bag can affect how much volume you measure for instance. In baking it’s essential you be as precise as possible as too much or too little of a certain ingredient will affect the result.
2. It’s quicker
You simply add the ingredients to the bowl, press zero and add the next ingredient. No trying to find a 1/2 cup measurement or cleaning the cup measurements because they previously had a sticky ingredient in them.
3. Less washing up
See above
4. It’s what the professionals do
I’ve worked in professional kitchens and we would use weight measurements for everything even eggwhites. Why? Because you want to get a consistent result.
5. The quantities you measure can vary depending on what style spoon/measuring cup you use.
6. Digital scales are inexpensive
Buying digital scales are really not an expensive investment. You can purchase a good quality one for around 30 US$
Lovely recipe, thank you. Nicholas, I think many people from the United States of America can probably do the conversion for themselves via scales or the internet. I hope I have made a correct assumption here that you are referring to the USA as, Canada, part of the continent of America, uses metric.
Hurray a great recipe with proper weights measurement – have you ever tried to get half a cupful of butter? – how ridiculous! Well done.
Tis not the cherry season in the UK and I don’t think frozen cherries will look quite the same somehow.
Hi Rachel! I love this recipe but I’m a little unsure of an American version for the cake pan (sandwich tin). I have two 6-inch round cake pans. Would these work for this recipe? I’m hoping to make a cute tiny cake for 2 🙂 Thanks so much!!!!
Hi, The cake tins Frankie used in this recipe are 19cm which are 7.4 inches. So you’ll have a little too much batter which you could simply fill into muffin cases in a muffin tin (they could be iced with leftover icing). Note the baking time will also vary with a different cake tin size.